dev container
docker和容器化技术让运维有了质的飞跃,从此,部署软件再也无需担心软件运行所需的繁杂环境,只要拉取镜像然后运行就可以将应用连带其部署的环境一步到位。
但是回想起我们的开发过程,谁还不是依然需要先安装一堆环境(编译器、库等等),然后才能进行开发。如果我们恰好还需要开发各种语言、各种应用,那光是繁杂的环境就足以把电脑搞的乱糟糟。更何况,大多数语言会拥有很多版本,而且版本之间兼容性不佳(例如Python),在自己电脑上安装多个版本的python有时候已经让人血压升高,何况我还要记得哪个版本在哪,哪个版本的库在哪,不同的版本用的是哪一个包管理器等等繁琐的细节……
于是,dev container的想法就产生了。顾名思义,就是在容器中开发。这样一来,开发的应用连带这开发环境就被”连根拔起“,以后就再也不需要担心重新配置开发环境的麻烦了,要做的仅仅是确认一下机器上有没有docker,然后运行一个容器开发就可以。
下面就以python为例,来说明一下如何使用vscode进行容器化开发。vscode中的远程开发和容器开发插件让dev container从概念变成了现实。
安装插件
我不想将容器运行在本地,于是采用了先远程开发连接服务器,再使用服务器上的容器开发的方式。但是不管怎样,本地vscode上安装了插件才能和远程连接开发。
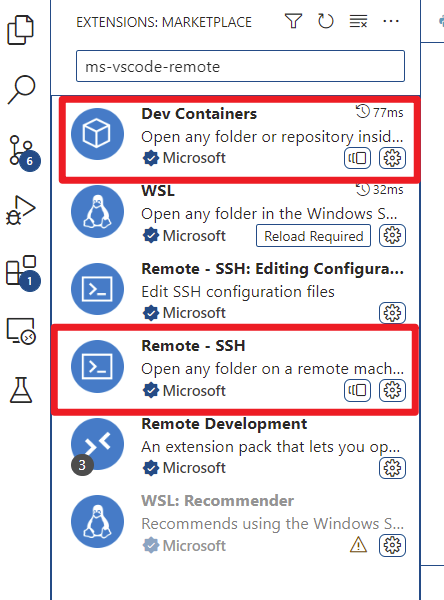
要安装的核心插件是ms-vscode-remote.remote-ssh和ms-vscode-remote.remote-containers两个。如图所示:
安装之后,可以在左侧看到远程连接的选项卡,进入后如图所示:
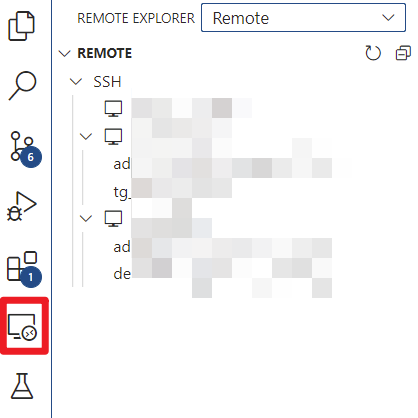
上面的下拉框可以切换是主机还是container。我们要做的是先ssh连接一台主机,再打开这个选项卡选到containers,就可以管理主机上的容器了。
配置文件
容器化开发的容器配置应该是因项目而异的。因为对于每个项目,所需要的环境都不尽相同。就算是两个python项目,开发中用到的包也不一样,不应该使用一个容器开发多个项目。
因此,项目的容器配置会放在项目目录下。vscode已经为我们准备好了范式,我们可以在项目下使用.devcontainer目录,存放devcontainer.json和Dockerfile、docker-compose.yaml文件。
devcontainer.json是vscode对容器的配置文件,里面存放了要启动或构建的镜像、要附带安装的vscode插件、创建后执行的命令等一系列信息。
Dockerfile中描述了我们特定项目需要的容器应该怎么构建。虽然可以直接使用一个官方镜像开发,但是最好还是做一些定制化,构建项目个性化的镜像。
docker-compose.yaml中指定了镜像应该如何运行。
以下就是python项目中对应配置文件的示例:
devcontainer.json:
// For format details, see https://aka.ms/vscode-remote/devcontainer.json or this file's README at:
// https://github.com/microsoft/vscode-dev-containers/tree/v0.202.3/containers/python-3
{
    "name": "Python 3",
    "build": {
        "dockerfile": "Dockerfile",
        "context": "..",
        "args": {
            // Update 'VARIANT' to pick a Python version: 3, 3.9, 3.8, 3.7, 3.6.
            // Append -bullseye or -buster to pin to an OS version.
            // Use -bullseye variants on local on arm64/Apple Silicon.
            "VARIANT": "3.9",
            // Options
            "NODE_VERSION": "lts/*"
        }
    },

    // Configure tool-specific properties.
    "customizations": {
        // Configure properties specific to VS Code.
        "vscode": {
            // Set *default* container specific settings.json values on container create.
            "settings": {
                "terminal.integrated.profiles.linux": {
                    "bash": {
                        "path": "/bin/bash"
                    }
                },
                "python.defaultInterpreterPath": "/usr/local/bin/python",
                "python.languageServer": "Default",
                "python.linting.enabled": false,
                "python.linting.pylintEnabled": false,
                "python.formatting.autopep8Path": "/usr/local/py-utils/bin/autopep8",
                "python.formatting.blackPath": "/usr/local/py-utils/bin/black",
                "python.formatting.yapfPath": "/usr/local/py-utils/bin/yapf",
                "python.linting.banditPath": "/usr/local/py-utils/bin/bandit",
                "python.linting.flake8Path": "/usr/local/py-utils/bin/flake8",
                "python.linting.mypyPath": "/usr/local/py-utils/bin/mypy",
                "python.linting.pycodestylePath": "/usr/local/py-utils/bin/pycodestyle",
                "python.linting.pydocstylePath": "/usr/local/py-utils/bin/pydocstyle",
                "python.linting.pylintPath": "/usr/local/py-utils/bin/pylint"
            },

            // Add the IDs of extensions you want installed when the container is created.
            "extensions": [
                "ms-python.python",
                "formulahendry.code-runner"
                // "ms-python.vscode-pylance"
            ]
        }
    },

    // Use 'forwardPorts' to make a list of ports inside the container available locally.
    // "forwardPorts": [9000],

    // Use 'portsAttributes' to set default properties for specific forwarded ports. More info: https://code.visualstudio.com/docs/remote/devcontainerjson-reference.
    // "portsAttributes": {
    //     "9000": {
    //         "label": "Hello Remote World",
    //         "onAutoForward": "notify"
    //     }
    // },

    // Use 'otherPortsAttributes' to configure any ports that aren't configured using 'portsAttributes'.
    // "otherPortsAttributes": {
    //         "onAutoForward": "silent"
    // },

    // Use 'postCreateCommand' to run commands after the container is created.
    "postCreateCommand": "pip3 install -r requirements.txt",

    // Comment out to connect as root instead. More info: https://aka.ms/vscode-remote/containers/non-root.
    "remoteUser": "root",
    // claws: use this option to run as root in container, else you can not save file because the project is in /root
    "containerUser": "root"
}
几个需要说明的地方:
- build.args中指定了一些构建镜像时带入的参数,会影响具体应用的构建。
- customization.vscode.extensions中指定了容器中要安装的插件,vscode创建开发容器时会自动安装这些插件。
- postCreateCommand中指定了容器创建成功后要执行的操作,通常可以在这里安装依赖。
- containerUser指定了容器运行的时候采用什么用户,默认是vscode,这里改成root,避免项目放在宿主机的/root下导致容器中修改无权限的情况。(因为容器运行时,项目目录是挂载到宿主机的)
- remoteUser指定了连接到容器使用的用户名,暂时还没搞清用途。。
Dockerfile:
# See here for image contents: https://github.com/microsoft/vscode-dev-containers/blob/v0.202.3/containers/python-3/.devcontainer/base.Dockerfile
# [Choice] Python version (use -bullseye variants on local arm64/Apple Silicon): 3, 3.9, 3.8, 3.7, 3.6, 3-bullseye, 3.9-bullseye, 3.8-bullseye, 3.7-bullseye, 3.6-bullseye, 3-buster, 3.9-buster, 3.8-buster, 3.7-buster, 3.6-buster
ARG VARIANT=3.9
FROM mcr.microsoft.com/devcontainers/python:0-${VARIANT}

# [Optional] Allow the vscode user to pip install globally w/o sudo
# ENV PIP_TARGET=/usr/local/pip-global
# ENV PYTHONPATH=${PIP_TARGET}:${PYTHONPATH}
# ENV PATH=${PIP_TARGET}/bin:${PATH}
# RUN if ! cat /etc/group | grep -e "^pip-global:" > /dev/null 2>&1; then groupadd -r pip-global; fi \
#     && usermod -a -G pip-global vscode \
#     && umask 0002 && mkdir -p ${PIP_TARGET} \
#     && chown :pip-global ${PIP_TARGET} \
#     && ( [ ! -f "/etc/profile.d/00-restore-env.sh" ] || sed -i -e "s/export PATH=/export PATH=\/usr\/local\/pip-global:/" /etc/profile.d/00-restore-env.sh )

# [Choice] Node.js version: none, lts/*, 16, 14, 12, 10
# ARG NODE_VERSION="none"
# RUN if [ "${NODE_VERSION}" != "none" ]; then su vscode -c "umask 0002 && . /usr/local/share/nvm/nvm.sh && nvm install ${NODE_VERSION} 2>&1"; fi

# [Optional] If your pip requirements rarely change, uncomment this section to add them to the image.
COPY requirements.txt /tmp/pip-tmp/
RUN pip3 --disable-pip-version-check --no-cache-dir install -r /tmp/pip-tmp/requirements.txt \
   && rm -rf /tmp/pip-tmp

# [Optional] Uncomment this section to install additional OS packages.
RUN apt-get update && export DEBIAN_FRONTEND=noninteractive \
    && apt-get -y install --no-install-recommends git

# [Optional] Uncomment this line to install global node packages.
# RUN su vscode -c "source /usr/local/share/nvm/nvm.sh && npm install -g <your-package-here>" 2>&1
这里进行一些简单说明:
- 开头指定了一个arg,和上面devcontainer.json文件中的对应,声明的参数值会在创建容器的时候被devcontainer.json文件中的参数值替换。
- 后面可以规定一些依赖进行安装,也可以安装一些额外的软件包。尽量使用这份示例中的参数,避免生成缓存,增大镜像的大小。
使用技巧
安装远程插件后,vscode打开项目目录时会自动循环是否启动container后重新打开,选是就可以快速构建启动容器,然后再容器中打开挂载的项目目录进行开发。
如果后来对容器配置进行了修改,可以用Ctrl+Shift+p快速打开命令面板,输入dev container rebuild,选择搜索出来的选项进行重新构建打开:

启动的开发容器会自动运行在docker后台,在remote插件中可以对容器进行管理,包括start、stop、remove等,而且状态一目了然,非常方便。
另外值得一提的是,近日github退出的codespace,本质上就是一个开发容器。可见,使用开发容器开发应用也是大势所趋了。